Getting voLTE on your Android with Fizz and others
Quick backstory : I used to have a phone provider which did raise the price of subscription without notification, just started charging more. I called them, they didn’t care and politely told me to fuck off (spoke about it a bit on LinkedIn here)
Direct consequence, moving all my subscription to another provider from another network (avoiding sister companies and fake competitors).
So I went for Fizz, a Canadian based company with good prices and a great flexibility allowing to share data across users. It’s a fully automated provider, basically no humans, aside of support chat.
They get really bad reviews due to this, but I’ve been very happy, they helped me quickly, and it’s great so far.
Getting to the point, this provider, as many others, are shutting down legacy networks (3G etc) this summer, with a warning on their site, letting you know that if your phone doesn’t support voLTE, you won’t be able to call or have SMS, and 911 capability won’t be available.
They do provide a limited list of supported phones, and tell you that they don’t support other, BUT, they won’t make anything to block them either.
I’m using a Google Pixel 3a with lineageos (previously running grapheneOS but they stopped support for lack of firmware patch support), allowing me to keep the system up to date.
The Pixel 3a does support voLTE, and, it was enabled and working on my previous provider. When I switched to Fizz, it would show that VoLTE wasn’t working.
Basically, dialing the code *#*#4636#*#* would load a « Testing » menu, then going in « Phone information », you’d go on the top 3 dots, and go for « IMS service status ».
When it doesn’t work, it will state « Unavailable » :
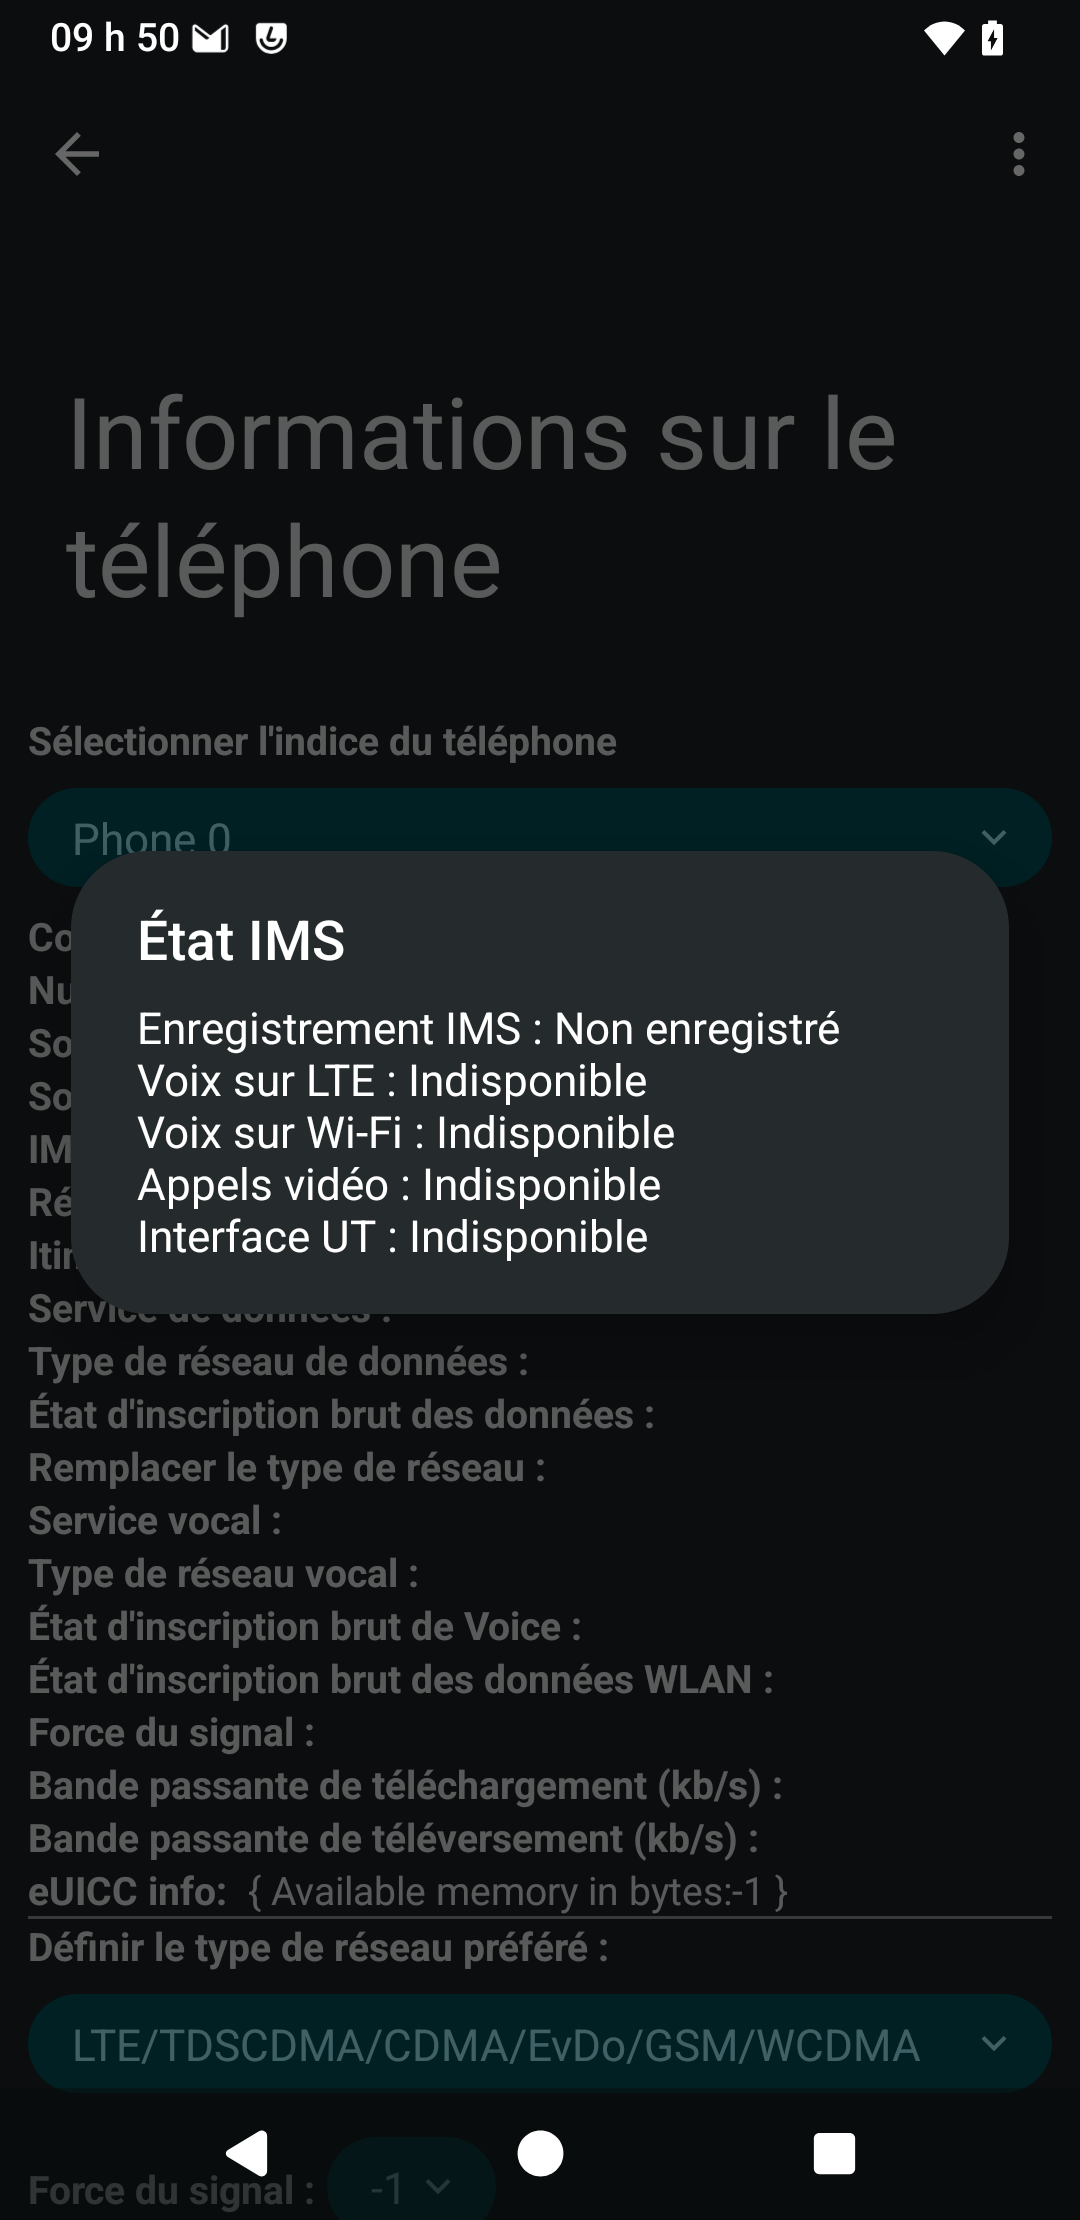
So that was the status of my phone. Fizz provides you with a short number that you can call to test if you are on VoLTE : #8378 (as explained on their explanation page why voLTE is important)
Key points to check before moving ahead :
- Making sure your phone supports voLTE (pixel 3a does)
- Making sure your physical SIM card supports voLTE (Fizz ones that support have a red lightning on it)
For some reasons, you need to force your Android voLTE capable phone to enable the support of voLTE.
I cam across many posts covering the topic, one of which is this one : https://xdaforums.com/t/enable-volte-vowifi-in-unsupported-countries-without-root-requires-shizuku.4550299/
I did like the idea of not needing to root the phone, and the ability to do all of this without requiring a computer.
So the actions that I needed to do were :
- Install Shizuku from the playstore (there is a complete guide for Shizuku here https://github.com/kyujin-cho/pixel-volte-patch/blob/main/README.en.md )
- Go in developer options in the phone, and enable « wireless debugging » (trust your own device network)
- Just follow the guide from Shizuku here and get Shizuku to start (wireless paring, filling the PIN and then starting Shizuku)
- Download and install the apk for Pixel IMS Application (the app is no longer in the app store, but you can get the apk from the link in the tutorial ) – Shizuku must be running to be able to edit the setting
- You’ll find most likely the tab for the SIM card of your provider (Fizz in my case), in which you can check « Enable voLTE »
Once done, you make sure it’s now appearing under Settings -> Network & Internet -> SIMs -> Your Sim card (Fizz in my case), scroll down and you should see to option to enable voLTE, if not already enabled :
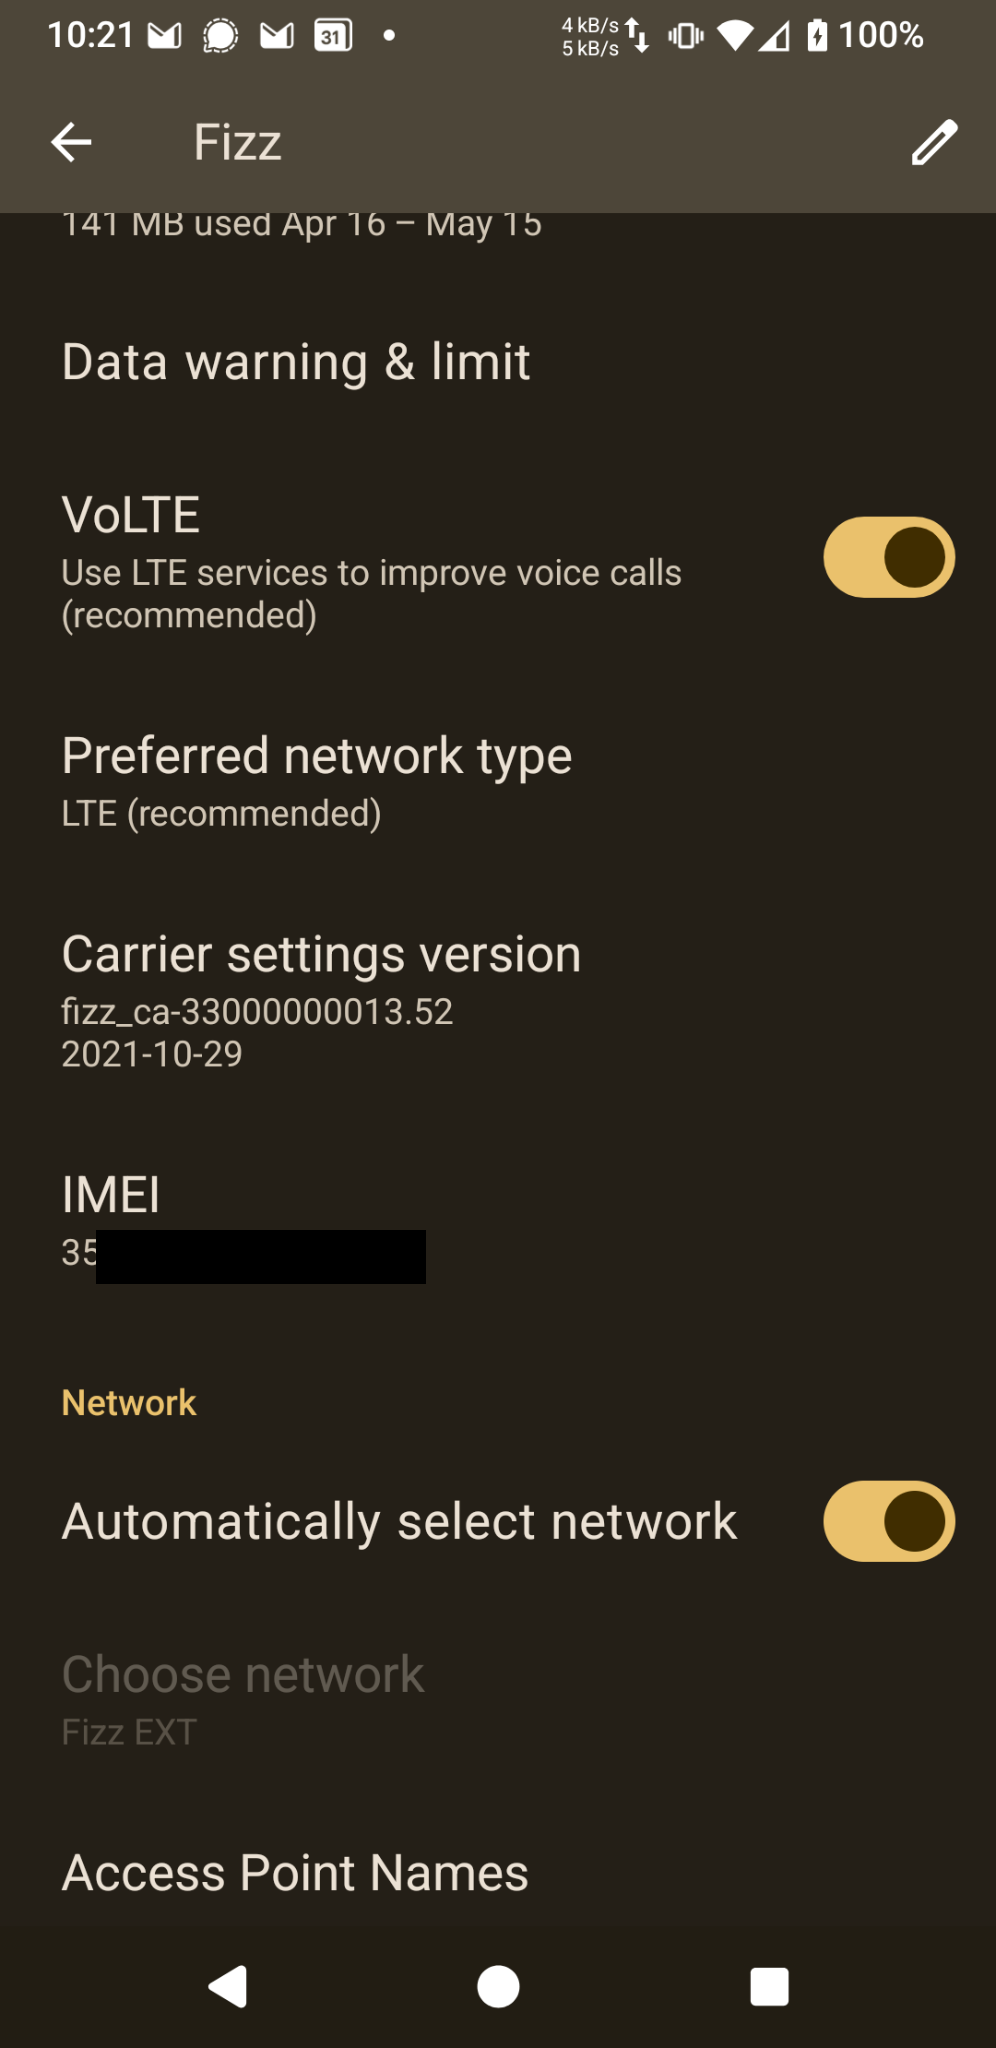
And there you have it !
Shizuku state that activating it by the wireless debug doesn’t survive reboot. It’s true that Shizuku is NOT running after reboot, and the wireless debugging get turned off (better for security), but it doesn’t matter because voLTE remains enabled in the system, and the option remain checked for the SIM card.
It may not survive a system update (new release of lineageos), but once you did it, you’ll see it takes like 2 minutes to apply again.
After having this in place, I get an nice confirmation by calling #8378 that my phone is calling on voLTE.
If you go dialing the code *#*#4636#*#* again, and the « Testing » menu, then going in « Phone information », you’d go on the top 3 dots, and go for « IMS service status », here is what you get when it works :
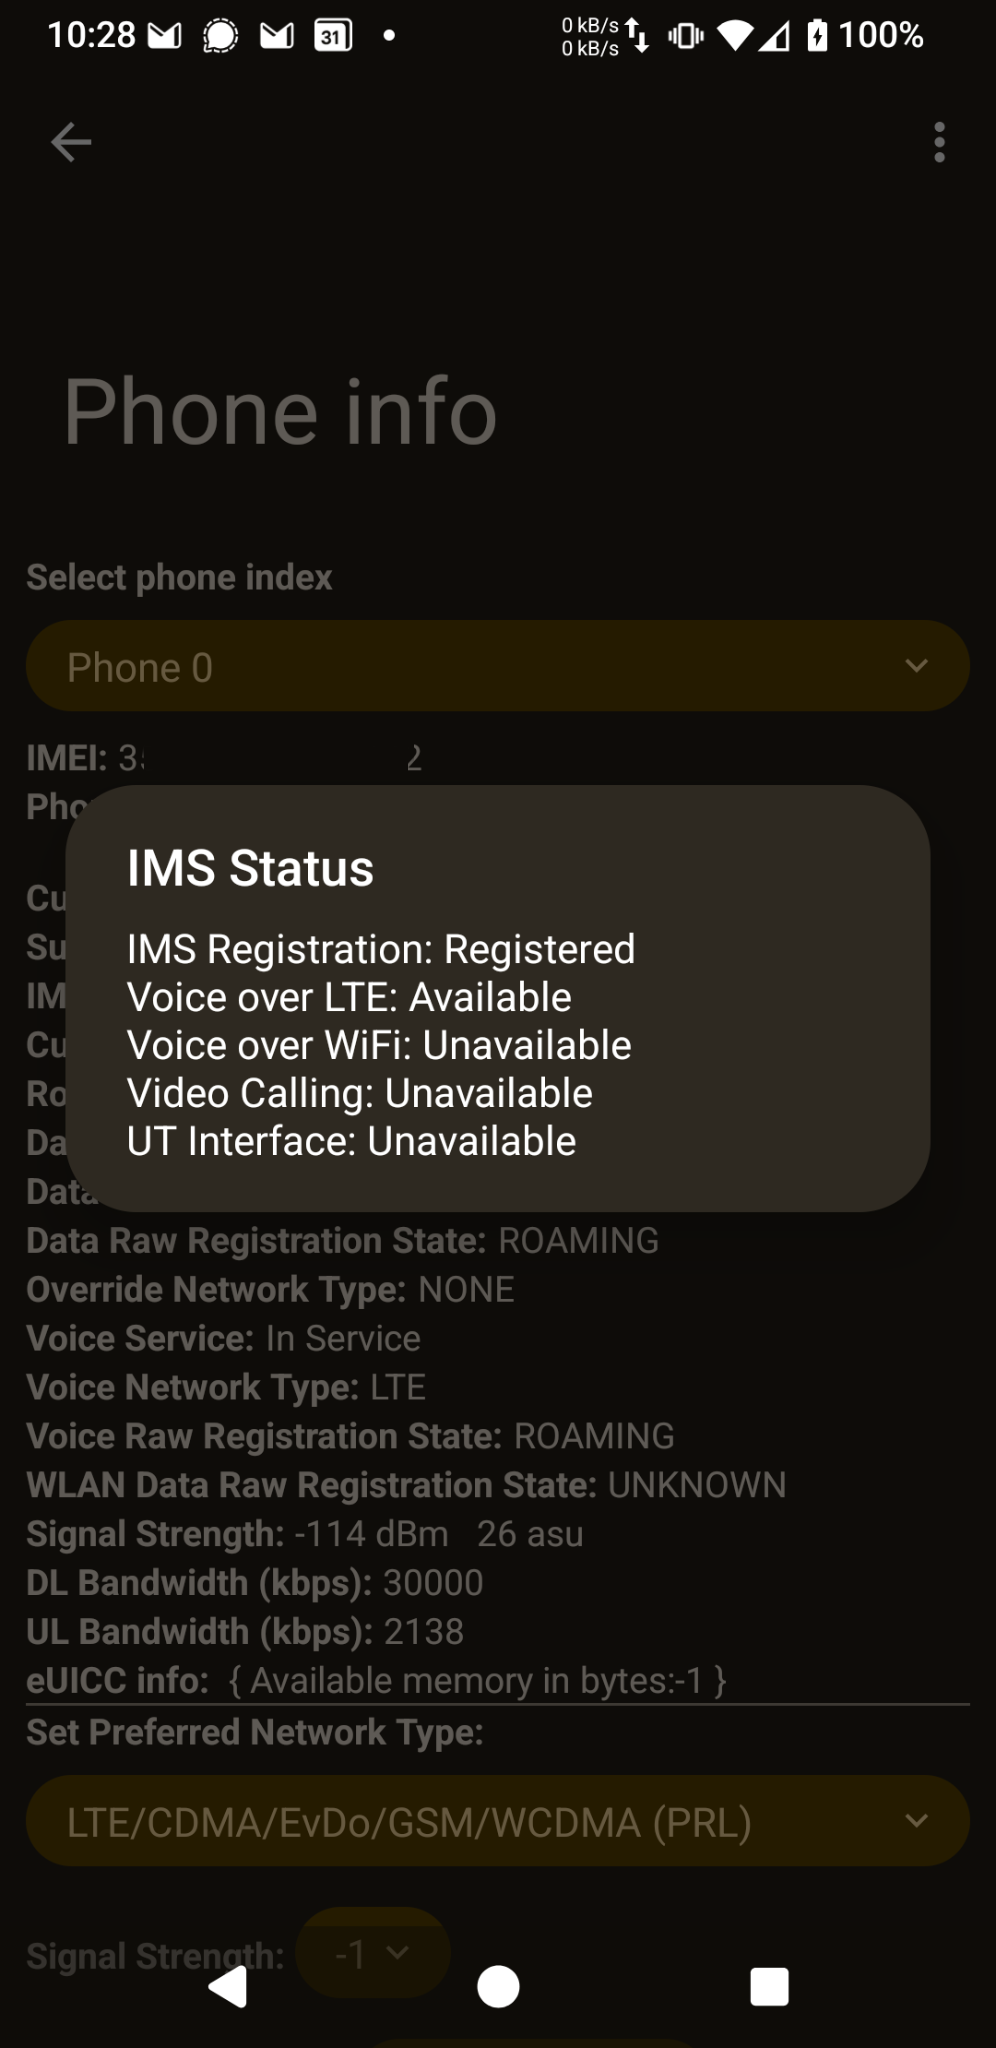
I hope this will help some of you getting their voLTE compatible phone working with providers that don’t push configuration to phone they didn’t test, but actually work well with it.
It will be a good memo for me if ever I need to do it again as well !
While it worked for Fizz and pixel 3a, I did read online people having successfully connected other phones like Sony android supporting voLTE and other, to different mobile providers in many countries.
![]()
Defining the scope of an ISMS within ISO 27001

Defining the scope of an Information Security Management System (ISMS) is a critical step in its implementation. Referring to hashtag#ISO27001
The scope defines the boundaries within which the ISMS will be applied, including the types of data, systems, and processes that will be protected.
Here are the steps to define the scope of an ISMS:
- Identify the organization’s objectives: Understand the purpose and goals of the ISMS. This includes the type of data to be protected, the systems involved, and the level of risk acceptable to the organization.
- Conduct a risk assessment: Identify potential risks to the organization’s assets, data, and systems. This includes both internal and external threats.
- Determine the critical assets: Determine which assets are critical to the organization and require protection. This may include sensitive data, systems, networks, and physical assets.
- Establish boundaries: Based on the risk assessment and asset identification, establish boundaries for the ISMS. This includes deciding what data, systems, and processes will be included or excluded from the scope.
- Consult stakeholders: Consult with relevant stakeholders, including employees, customers, and suppliers, to ensure that the scope is acceptable to all parties involved.
- Document the scope: Document the scope of the ISMS in a clear and concise manner. This should include details on what is included and excluded from the scope.
Some key considerations when defining the scope of an ISMS include:
Data Classification: Classify data into categories based on sensitivity and risk. Only protect sensitive data that is critical to the organization’s operations.
System boundaries: Define which systems will be protected, including hardware, software, and network devices. (The boundaries may be extended if identified data resides on systems not initially identified as part of the scope)
Process boundaries: Define which processes will be protected, including those related to data handling, storage, and transmission.
Third-party relationships: Establish clear expectations with third-party providers, suppliers, and contractors regarding the protection of sensitive data and systems. (This will help qualify vendors and providers along the way)
By following these steps and considering these key aspects, organizations can define a scope for their ISMS that is effective, efficient, and aligns with their overall business objectives.
#cybersecurity #ISMS #ISO27001 #governance #compliance
Originally posted on my LinkedIn
![]()
Resumed posting and expanding on X
Quick update, after all the hick up on LinkedIn, I started to make sure I cross post between X (twitter) and LinkedIn for the daily threat and cyber info.

It would not make sense to post this on my blog as this is quickly evolving information with fairly short lifetime.
Interestingly, LinkedIn support got back to me on X (Twitter), as this is one (slow) way to reach out to them when you are locked out from the platform. You can find them here : https://x.com/LinkedInHelp
They apologized for the delay in their response, and said they’d escalate the information to handle it better in the future. I hope to never get automatically kicked out by their AI again, but good to keep as reference.
I resumed my posting, and managing the company pages I handle for many cyber security companies, so as sharing about my partners and sponsors. I guess I’m kind of a mix between « content creator », and a cyber security expert advisor (sitting on couple of boards as well, not listed because I’ve enough cold calls and messages like this already).
Anyhow, that’s the update about it. Wishing you a good day all ! connected=hacked, stay aware !
![]()
Links

Calendrier
| L | M | M | J | V | S | D |
|---|---|---|---|---|---|---|
| 1 | 2 | 3 | 4 | 5 | 6 | |
| 7 | 8 | 9 | 10 | 11 | 12 | 13 |
| 14 | 15 | 16 | 17 | 18 | 19 | 20 |
| 21 | 22 | 23 | 24 | 25 | 26 | 27 |
| 28 | 29 | 30 | 31 | |||
Recherche
Derniers articles
Tresronours Twitter

Keywords cloud topic
Membre de la FSF
Liens qui vont bien
Mots clés vrac – keyword cloud
License du contenu – CC By NC SA

This création is licensed under a Creative Commons Paternité - Pas d'Utilisation Commerciale - Partage des Conditions Initiales à l'Identique 2.0 France License.
Archives
- Getting voLTE on your Android with Fizz and others
- Defining the scope of an ISMS within ISO 27001
- Resumed posting and expanding on X
- Linkedin Access to your account has been restricted – Final debrief and resilience plan
- I’m thankful for the support I get in rough time
- Cyber security news of the day – 2024 May 31
- Alexandre Blanc Cyber Kicked out from Linkedin
- You’ll most likely find me on LinkedIn
- The Russian roulette landing page !
- RTSP, Debian, VLC, not playing, IP Camera
- 5G network hosted in the cloud, no internet, no phone ! So smart ! And I ended on TV, This week in cyber
- They lock the door for privacy… but they keep a copy of the key, and couple of backdoors
- Worst is yet to come, but they all warned you
- Migrating an old WordPress and handling character set, UTF8, latin1, latin1_swedish_ci
- From a broken TLS CA, to Facebook, to FIN12 hit and run
- Yes we can fix this mess, but do we want to ? That’s another story
- Criminals are still dominating the game, why are we doing so wrong, and what can we learn in this tech ocean ?
- Riding cloud can be tricky, don’t fall from it, in the weekly cyber !
- The threat landscape is very dynamic – Cyber news this week
- Cybersecurity is not obvious even for this newsletter !
- Install Slack desktop app on Kali rolling fixing libappindicator3-1 missing dependency
- How to delete all resources in azure to avoid charges after trial on your forced credit card registration
- Proxmox – ZFS – Dead drive on active VM, recover from replicated disk
- Restrict access to proxmox web admin interface
- Migrate your ESXI VMs to proxmox ZFS
- Install your VPN server with pi-hole on OVH VPS in 30 min
- Using raspberry pi 3 as wifi bridge and repeater and firewall
- Raspberry 3 – create a wifi repeater with USB wifi dongle
- raspberry 3 – routeur pare feu point d’acces wifi avec filtrage pub et tracking – router firewall access point with ads and tracking filtering
- Dell XPS 13 touchpad – corriger la sensibilité
- Utiliser Zazeen set top box depuis une connexion videotron
- Fermeture de mon compte facebook – la dernière goutte
- Choisir un kernel par defaut au demarrage de Centos 7.2 – configuration grub2
- Openvpn access server 2.0.25 et android
- Régler la luminosité du laptop par ligne de commande
- chromium outlook web app version complete sous linux
- Nexus 7 2012 – android 5 lollipop solution au probleme de lenteur
- HDD led sur Xubuntu – xfce
- xubuntu 14.04 verrouiller ecran de veille et desactiver mise en veille a la fermeture de l’ecran
- Authentification avec Radmin en utilisant Wine sur Gentoo
- Patcher bash sur une distribution plus supportee comme fedora 11
- Zimbra desktop sous xubuntu 14.04 64bit – fix
- xubuntu 12.10 probleme de son avec VLC – pulse audio – alsa – toshiba L855D – solution
- Evolution sous xubuntu 12.10 – bug affichage a la configuration – solution temporaire
- Booster son acces internet en changeant de DNS pour opendns
- Serveur DLNA sous ubuntu – minidlna
- sshfs sous windows – dokan sshfs
- xubuntu 11.10 Installer le plugin java pour firefox
- Installer Google Earth sur Xubuntu 11.10
- Installer nagios sur Fedora 11 depuis les sources