Technologie
Install Slack desktop app on Kali rolling fixing libappindicator3-1 missing dependency
If you try to install Slack desktop app on Kali linux latest rolling as of May 2021, you face a missing dependency of libappindicator3-1 which makes it complicated to get the app installed.
You can force the install with :
dpkg -i –force-depends slack-desktop-4.15.0-amd64.deb
But then when you run an apt update and apt upgrade, you have dependency issue with the same libappindicator.
Dirty workaround is go and edit /var/lib/dpkg/status and remove libappindicator3-1 from the package dependency, then you can apt update and apt upgrade without getting slack removed.
Finally so as you know, libappindicator3-1 have been replaced in kali by libayatana-appindicator ( https://github.com/jgraph/drawio-desktop/issues/504 )
I hope that it will help you.
Have a good day. I hope this helps.
![]()
How to delete all resources in azure to avoid charges after trial on your forced credit card registration
Warning, this article aims to show you how to delete everything, so make sure you have backups of your data and anything before deleting resources !!! In my case, this was after course, and I did not want anything to remain.
I assume that if you manage azure resources, you know what you want to delete. Be careful.
So you went for an azure training, and you have been asked to either have an active account or a trial account.
You created your account and were forced to provide your credit card despite the fact that you absolutely don’t plan to give a single buck to the cloud.
But the cloud nature is to take money, a lot of money, so the very first step, before you can do anything, it to take your credit card.
I recommend you use a temporary credit card like privacy.com or lastcard.com based, or even your if your bank provide temporary credit cards.
Anyways, here we are, for some reason you had to setup stuff in azure and you don’t want to take any chance, make sure you cleanup as much as can do. It took me a while to get this, and this was not 100% clear for the trainer as well (full cleanup process, platform change often).
So here is how you can cleanup everything.
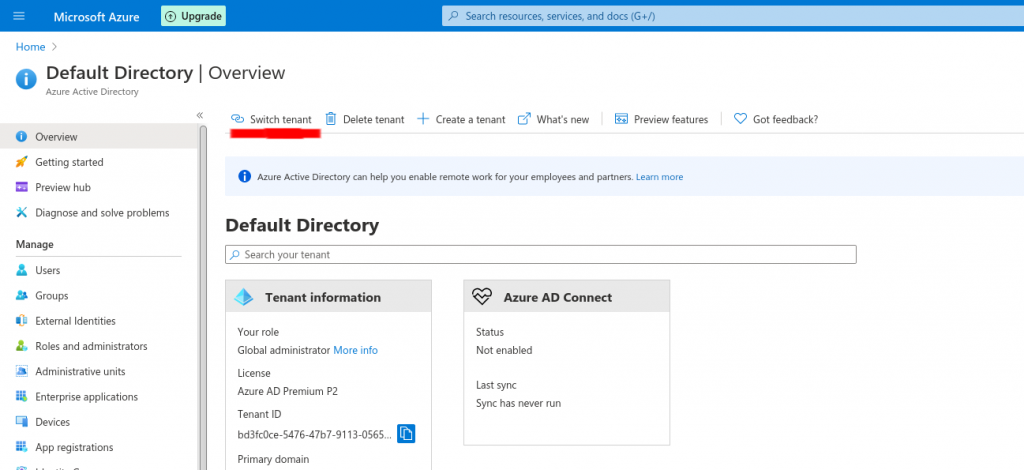
For each tenant you want to get rid of (most likely all) you’ll have to do this (in Azure portal, you can switch tenant by going to the « Azure Active Directory » tab, and use the menu « switch tenant ».
While in the tenant you want to clean up, we’ll use the « Azure Resource Explorer » as key tool in this.
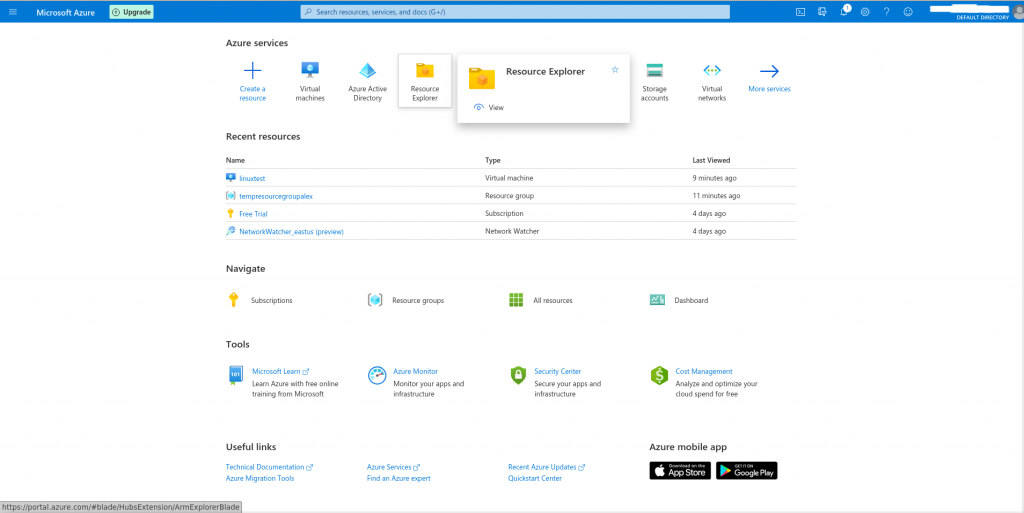
This takes you to the Azure Resource Explorer blade (yes, panels or tabs are called « blades »), in which all resources are listed under « Subscriptions ».
So you’ll expand the Subscriptions tree, for each and every subscription in which you want to delete assets.
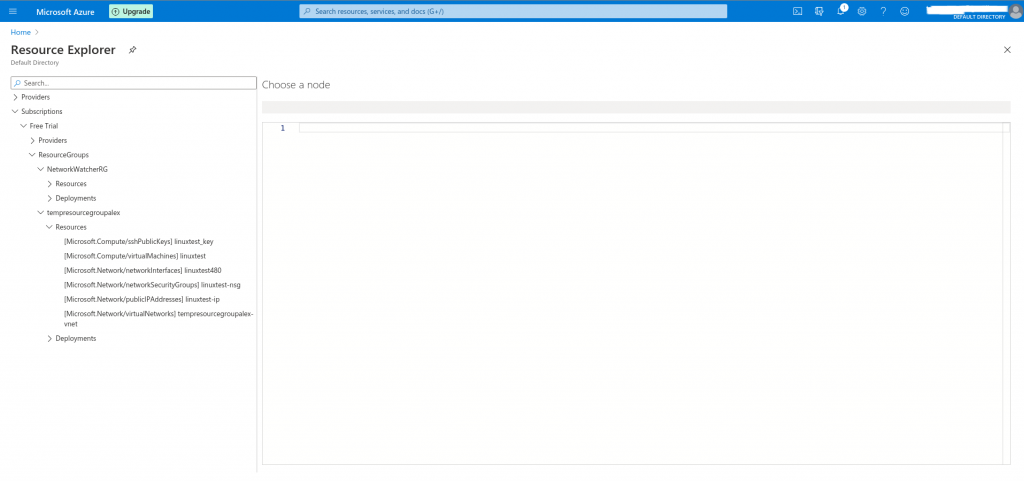
You expand all the « ResourcesGroups », and you’ll go delete assets 1 by one under « Resources » for each « ResourcesGroup »
Select a resource, and above the JSON detailed configuration, you click on « Open blade »
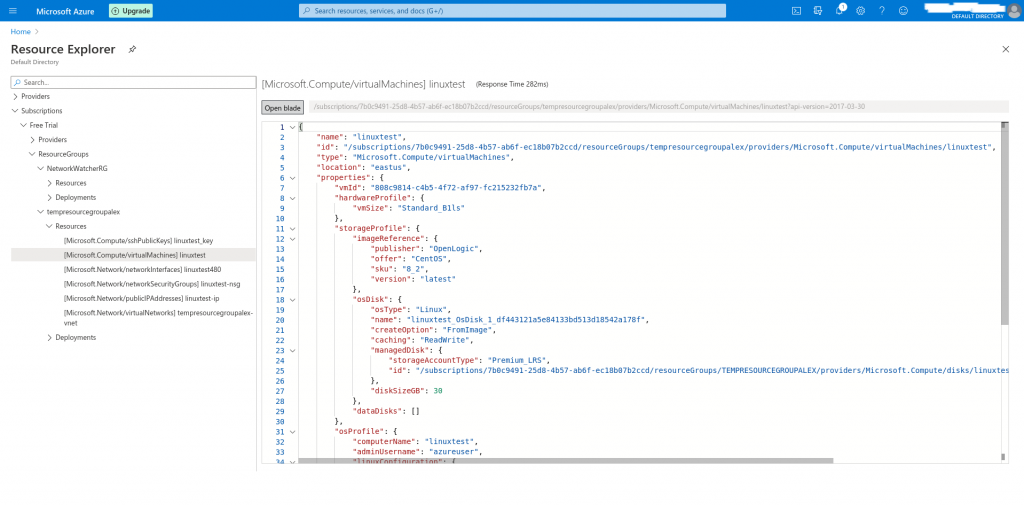
It will take you to the resource blade, from where you can delete the resource
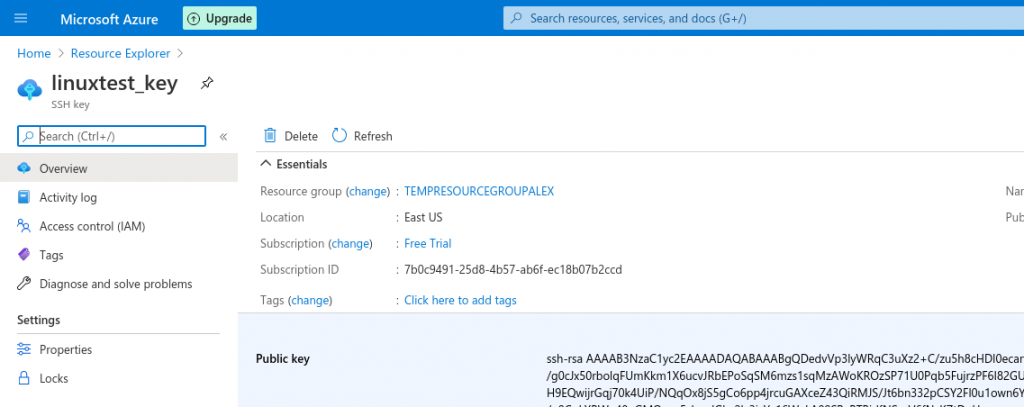
It will ask for confirmation, confirm :
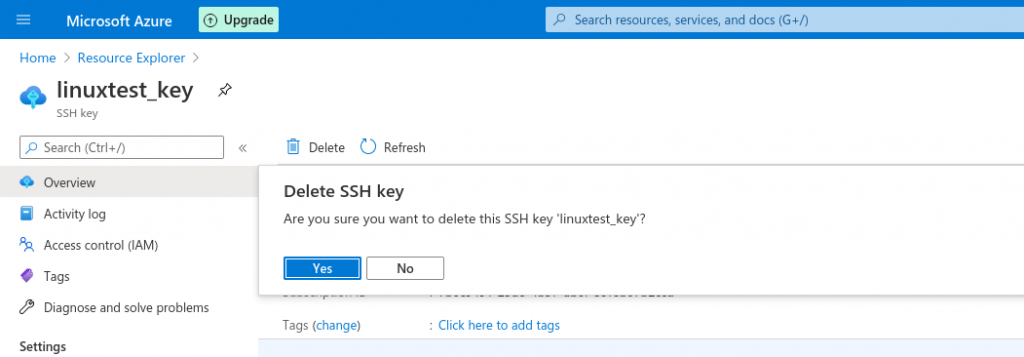
And then from the navigation tree, go back to Resource Explorer.
Do this for each and every items up to the Resources Group itself :

Which you confirm by typing the name.
As the cloud is slow and inefficient, you’ll face a lot of refresh issues, and you’ll have to reload the web page many times to hope to have a clear picture on what is still there and what is not.
The notifications area will pop some partial notifications, but to actually have a detailed view of what is really happening, and what is the status (deleting resources in the cloud is painfully slow and inefficient), so under the « Notifications » button (little bell, top right of the screen), click on « More events in the activity log »
From there, you’ll have a better view of what happens, but by default, it doesn’t show much, you will have to expand each and every task to actually have an idea. As the top level task may show « Succeeded », but some sub task are not done at all.
When nothing is left in the « Resource Explorer », under every Subscriptions, you know you are done, and hopefully, the cloud won’t charge you.
Oups, don’t forget to cancel the subscription ! If it’s a trial, you can’t, you’ll have to wait for expiration, but if you don’t have any resources under it, you should be fine.
Another thing to check, is under « Licenses », search in the top search bar for « Licenses », make sure that NO LICENSE are still assigned. If they are, you’ll be charged !
EDIT : Another point to check are the services you might have subscribed that may not appear under resources, such as « Azure Security center », « Azure Sentinel », and « Azure DDoS protection ». Make sure you disable all of these too ! <— Don’t forget additional services ! They are costly !
EDIT2 : Another point, when it comes to deleting a tenant that was tight to a subscription : You need to have a user created on the domain of the tenant, with Global admin privileges. Then, you have to log in office365 (absolute nonsense) to cancel your subscription :
https://businessstore.microsoft.com/en-in/manage/inventory/subscriptions
From there, you can actually delete the subscription. Then, you have to go back in azure, logout, login (you’d better do this after each and every action, this platform is slow as hell and mostly never reflect any action you take).
Delete the admin user you had to create, and leave only your default user as global admin. Grand subscription management rights to your external/default user, so as you can proceed. BUT, even after doing so, while you should not be charged, you’ll have to wait for he « grace » recovery delay for the subscription to be completely de validated. Then maybe you may be able to delete the tenant. Pure nightmare.
Not easy at all to escape from the cloud, or at least, hoping that they won’t take money on your credit card. Because they will, if you forget anything, they won’t forget you !
![]()
Proxmox – ZFS – Dead drive on active VM, recover from replicated disk
So you run a proxmox cluster, and you have 3 nodes.
Your VMs are all replicated, using ZFS replication, and in HA mode.
Each ZFS volume runs on a single drive, because we don’t have too much money, and it’s an home setup, OR, your RAID back end went nuts and you lost a full physical volume.
Issue is, your VM did not migrate through HA to another node, because obviously, the PVE node was not down, as only 1 of the ZFS drives died.
Then, I had major power outage, and a second one, ending after auto reboot, with some VMs on one node, some on another, and, this specific VM (my nextcloud), with a 1TB virtual disk, that was on the dead physical disk.
At this stage, I have a failed VM, on an active node, without valid disk for the VM, BUT, thanks to the cluster, I still see with « zfs list » on the other nodes, that the replicated copies are still here !
So here are the steps, finally easier and faster than expected :
Move the VM manually in another node of the cluster, and this is very simple, as SSH with a shell on any PVE nodes :
mv /etc/pve/nodes/pve1/qemu-server/106.conf /etc/pve/nodes/pve6/qemu-server/
Now, you did it, refresh the web interface, and the VM is now back on the node that has a valid disk for your VM ! …but it won’t start because it was in failed state at HA level. Not an issue, on the VM, menu « more », manage HA, and set it to « disabled », validate. Then again, in the menu, set it to « started ».
VM should start again, using the replica of the disk !
Now, on the node that had the failed disk, I have SATA drives, I just hot unplugged the dead unit, and put a new disk.
Initiate the new disk as GPT, and we’ll need to add it to ZFS. Issue is, volume already exists. So we need to go to « datacenter » then « storage », double click on the needed ZFS Pool, and uncheck the node that had the failed drive.
Validate, and go add the disk on the node, in ZFS, with the same ZFS Pool name.
Now you have valid new ZFS volume.
Make sure your run the replication from the currently running node, to this empty volume !!! So has you have the data replicated again.
I was a bit stressed, even if I have backup on another machine at filesystem level with backuppc of my VM content, it’s always much much much more easy and quick to get the existing VM back on track.
I hope it will help you. I realized at least how easy and simple it is to move a VM that is not running from one host to another.
Have a great day, and go to hell power outage and dead drives ! (Yes I have UPS, surge protection… still).
![]()
Links
Calendrier
| L | M | M | J | V | S | D |
|---|---|---|---|---|---|---|
| 1 | ||||||
| 2 | 3 | 4 | 5 | 6 | 7 | 8 |
| 9 | 10 | 11 | 12 | 13 | 14 | 15 |
| 16 | 17 | 18 | 19 | 20 | 21 | 22 |
| 23 | 24 | 25 | 26 | 27 | 28 | |
Recherche
Derniers articles
Tresronours Twitter
Keywords cloud topic
Membre de la FSF
Liens qui vont bien
Mots clés vrac – keyword cloud
License du contenu – CC By NC SA
Archives
- Getting voLTE on your Android with Fizz and others
- Defining the scope of an ISMS within ISO 27001
- Resumed posting and expanding on X
- Linkedin Access to your account has been restricted – Final debrief and resilience plan
- I’m thankful for the support I get in rough time
- Cyber security news of the day – 2024 May 31
- Alexandre Blanc Cyber Kicked out from Linkedin
- You’ll most likely find me on LinkedIn
- The Russian roulette landing page !
- RTSP, Debian, VLC, not playing, IP Camera
- 5G network hosted in the cloud, no internet, no phone ! So smart ! And I ended on TV, This week in cyber
- They lock the door for privacy… but they keep a copy of the key, and couple of backdoors
- Worst is yet to come, but they all warned you
- Migrating an old WordPress and handling character set, UTF8, latin1, latin1_swedish_ci
- From a broken TLS CA, to Facebook, to FIN12 hit and run
- Yes we can fix this mess, but do we want to ? That’s another story
- Criminals are still dominating the game, why are we doing so wrong, and what can we learn in this tech ocean ?
- Riding cloud can be tricky, don’t fall from it, in the weekly cyber !
- The threat landscape is very dynamic – Cyber news this week
- Cybersecurity is not obvious even for this newsletter !
- Install Slack desktop app on Kali rolling fixing libappindicator3-1 missing dependency
- How to delete all resources in azure to avoid charges after trial on your forced credit card registration
- Proxmox – ZFS – Dead drive on active VM, recover from replicated disk
- Restrict access to proxmox web admin interface
- Migrate your ESXI VMs to proxmox ZFS
- Install your VPN server with pi-hole on OVH VPS in 30 min
- Using raspberry pi 3 as wifi bridge and repeater and firewall
- Raspberry 3 – create a wifi repeater with USB wifi dongle
- raspberry 3 – routeur pare feu point d’acces wifi avec filtrage pub et tracking – router firewall access point with ads and tracking filtering
- Dell XPS 13 touchpad – corriger la sensibilité
- Utiliser Zazeen set top box depuis une connexion videotron
- Fermeture de mon compte facebook – la dernière goutte
- Choisir un kernel par defaut au demarrage de Centos 7.2 – configuration grub2
- Openvpn access server 2.0.25 et android
- Régler la luminosité du laptop par ligne de commande
- chromium outlook web app version complete sous linux
- Nexus 7 2012 – android 5 lollipop solution au probleme de lenteur
- HDD led sur Xubuntu – xfce
- xubuntu 14.04 verrouiller ecran de veille et desactiver mise en veille a la fermeture de l’ecran
- Authentification avec Radmin en utilisant Wine sur Gentoo
- Patcher bash sur une distribution plus supportee comme fedora 11
- Zimbra desktop sous xubuntu 14.04 64bit – fix
- xubuntu 12.10 probleme de son avec VLC – pulse audio – alsa – toshiba L855D – solution
- Evolution sous xubuntu 12.10 – bug affichage a la configuration – solution temporaire
- Booster son acces internet en changeant de DNS pour opendns
- Serveur DLNA sous ubuntu – minidlna
- sshfs sous windows – dokan sshfs
- xubuntu 11.10 Installer le plugin java pour firefox
- Installer Google Earth sur Xubuntu 11.10
- Installer nagios sur Fedora 11 depuis les sources


