Raspberry 3 router project FAQ
Raspberry 3 router project FAQ
Last update 2019 Apr 21 (reference added how to open and NAT on SSL port 443 given it is blocked for pi-hole performance)
What is this
What is the current situation of the project
Where do i download the image for my raspberry
What is the image format, and how do i use it ?
How to edit configuration files and change the pi account password ?
Key configuration files
What are these files in /home/pi
Changing the IP Range of your network
What is this pi-hole thing and how do i change the password ?
What are these line starting with # in the rc.local and others files ?
Allowing ping (ICMP) to the device from outside (internet)
Reserving IP for a device in DHCP (USB Ethernet LAN only)
Redirecting a PORT to an internal device (NAT/ROUTING) to host a service
Installing the noip client on your router
How to update my system (security requirement)
Setup proper time on the device
Adding email sending capability (reports, logwatch etc)
Install arpwatch to receive MAC address change activity on the network
A screen for the raspberry
Change the SSH listening port
Allowing remote SSH to your router from internet (with knockd)
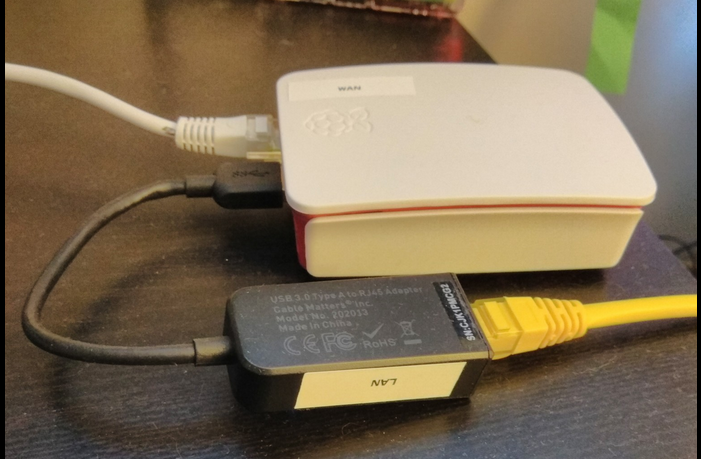
How do i plug more than one device on the LAN port (USB Ethernet)
Configuring Kuman LCD 3.5 Inch RGB TFT
Using-raspberry pi 3 B+ as wifi bridge
Updating firmware (kernel) with rpi-update
pivpn, use your raspberry as a VPN server
Opening SSL port 443 and NAT it to an internal machine
Contacting me for more information
What is this ?
This is related to this post : http://blog.inforeseau.com/2018/06/raspberry-3-point-dacces-wifi-avec-filtrage-pub-tracking-access-point-add-tracking-filtering
It provides additional information to tweak the raspberry image i made available for download, to be used as router and wifi access point, with add filtering.
What is the current situation of the project ?
In short, the device works as a router/firewall/wifi access point, using the image available for download, on a raspberry pi 3
More info : This all started by creating a WIFI Access point on raspberry, then i added a Pi-hole, then a firewall (iptables), and the support for additional LAN (aside of WAN port and wifi).
Where do i download the image for my raspberry ?
This FAQ only refer to the latest image (bottom of the list) :
raspberry3-piholeap-16GB-autonet-20180618.img.bz2 (first public image require >16GB Micro SD – automatically detect NIC and wifi, and start A/P while getting IP by DHCP on ethernet port)
raspberry3-piholeap-16GB-autonet-firewall-wan-20181023.img.bz2 (second image, added iptables to block incoming traffic on Ethernet port, so as it can safely be plugged on unsecured network)
raspberry3-piholeap-16GB-autonet-firewall-wan-lan-usb-20181025.img.bz2 (third image, added support for cablematters USB-ethernet adapter to handle wired network as LAN)
Current one, recommended for download :
raspberry3-piholeap-8GB-autonet-firewall-wan-lan-usb-20181109.img.bz2 (enhanced rc.local script, bringing some setting in variable, updated system, reduced size to 8GB to fit on smaller cards)
What is the image format, and how do i use it ?
The image format is .img, compressed with bzip2. The image is taken with the dd (disk dump) command on linux, and therefore, create a flat image of the full media (8GB for an 8GB micro SD even if only 2.1GB is used)
Creating the image
When i want to publish an image of the current state, assuming it might be useful, this is the way i create it :
Taking image on my laptop of the SDCARD :
sudo dd bs=4M if=/dev/mmcblk0 of=raspberry3-image.img
Then i usually compress it :
bzip2 raspberry3-image.img
Which gives me the image i upload in .bz2 format.
Restoring the image
Assuming you have your raspberry with the needed hardware, and a memory card, here are ways to restore it.
First of all you need to decompress the file, from bz2 to img, either with the bunzip2 command on a linux OS : bunzip2 raspberry-image.img.bz2, or using 7zip on windows system, extract here.
Using etcher is somehow the easiest way, while it is kind of time consuming, it works. Grab the latest etcher version for your OS here : https://www.balena.io/etcher/ And select the .img file, select your micro sd card as target, flash. Wait until it finishes. All good. This require to have a target storage at least as big as the original image, otherwise it would not restore.
If you are a GNU/linux user, you can simply use DD, the other way around :
sudo dd if=raspberry3-image.img of=/dev/mmcblk0
This is usually working, while not showing the restoration progress, it allows you to fit on smaller micro SD cards, even when finishing with an out of space error, it will usually work, because the system on the image only use 2.1GB average.
If you come to the point that your target volume was too small, when you boot your raspberry the first time, it is highly recommended that you use the expand file system option, so as the table of content of the card will be rewritten matching the real available space, and would avoid risk of data loss on the system.
Logged on the system itself (either directly, or through SSH), as user « pi », and password « welcomepriv2 », you do :
sudo bash
raspi-config
7 – advanced options
A1 expand file system
Then, confirm, and reboot when prompted, this will make sure your filesystem match the actual card size.
How to edit configuration files and change the pi account password ?
There are many ways to edit config files, and you should use the one you are more comfortable with.
option 1 – Shutdown the PI, put the MicroSD in your PC, et edit the file with notepad++ and ext filesystem support (if you run windows), to preserve UTF format), any editor on GNU/Linux
option 2 – Directly on the PI, using SSH (using PUTTY if you run windows) or ssh pi@device-ip from Linux, and from there :
2a – Using « VIM » editor, vim filename, then move to the needed line, type « i » to switch to insert mode, when done, press « escape » then « :wq » and press « enter » (to write and quit). If anything goes wrong, press « escape » then « :q! » and press « enter » (quit without saving) – very quick introduction to vim :P
2b – Using « NANO » editor, nano filename, then, kind of easier, just go where you want with the keyboard arrows, change as in notepad, and use the CTRL+X to quit, confirm saving. (at the bottom of the screen, all the commands are listed, so it is kind of easy).
With option 2, once you connected to the raspberry as pi, type the command « passwd », provide the default password if asked (welcomepriv2) and type the one you want when prompted.
Note : This only change the pi account password. To change the wifi password, look at the rc.local file. To change the pi-hole password, look at the pi-hole config.
Key configuration files allowing you to customize the router
The main files, aside of installed packages / tools, to look for, are the following :
/etc/rc.local : Define the whole configuration, from A/P name and password, to actual firewall rules.
#!/bin/sh -e
#
# rc.local
#
# This script is executed at the end of each multiuser runlevel.
# Make sure that the script will "exit 0" on success or any other
# value on error.
#
# In order to enable or disable this script just change the execution
# bits.
#
# By default this script does nothing.

# Print the IP address
_IP=$(hostname -I) || true
if [ "$_IP" ]; then
printf "My IP address is %s\n" "$_IP"
fi


# Create Access point wifi raspap other USB adapter
#/usr/bin/create_ap --isolate-clients --daemon --ieee80211n --ht_capab '[HT40+]' -c 44 -w 2 wlxe84e0651e6f6 enxb827eb9446d8 raspappriv welcomepriv2

#Identify the NIC in the raspberry (WAN, all OUTGOING allowed, no INCOMING allowed)
onboardwan=`/root/get-nic.sh`
#Identify an other NIC in the raspberry (USB plugged one, to be used as LAN, aside of wifi)
usbnic=`/root/get-2nd-nic.sh`

#Force dhcp on interface
/sbin/dhclient ${onboardwan}

#update the NIC interface in the pi-hole config
#drop interface (last line)
/bin/cat /etc/dnsmasq.d/01-pihole.conf| grep -v interface > /root/01-pihole.conf.tmp
#update file without interface
/bin/cat /root/01-pihole.conf.tmp > /etc/dnsmasq.d/01-pihole.conf
#Add interface
/bin/echo "interface="${onboardwan} >> /etc/dnsmasq.d/0i plug more than one device on the LAN port (USB Ethernet)1-pihole.conf

#restart the service
#systemctl restart dnsmasq


#Define wifi SSID
wifissid="raspappriv"

#Define wifi password
wifipass="welcomepriv2"

#Define wifi ip-net /24 by default
wifinetip="192.168.12.1"
# For home we keep subnet isolated (no bridge) to be able to force web filtering via pi-hole and we allow communication between devices (default IP for the AP is 192.168.12.1 and we run a pi-hole on it for DNS fo we force DNS server to be itself) using embedded wifi
/usr/bin/create_ap --daemon --dhcp-dns ${wifinetip} --ieee80211n --ht_capab '[HT20+]' -c 11 -w 2 wlan0 ${onboardwan} ${wifissid} ${wifipass}

#Now we want to protect the connected interface assuming this is WAN, and nothing from there should come in
#create_ap brings its own rules already
#I accept only packets that were initiated by the device
iptables -A INPUT -m state --state RELATED,ESTABLISHED -j ACCEPT
#If you want to allow ping from outside to your device, uncomment below
#iptables -A INPUT -p icmp -j ACCEPT
#We fix slowlyness due to pi-hole as explained here : https://pi-hole.net/2018/02/02/why-some-pages-load-slow-when-using-pi-hole-and-how-to-fix-it/
iptables -A INPUT -p tcp --destination-port 443 -j REJECT --reject-with tcp-reset
iptables -A INPUT -p udp --destination-port 80 -j REJECT --reject-with icmp-port-unreachable
iptables -A INPUT -p udp --destination-port 443 -j REJECT --reject-with icmp-port-unreachable
#If you want to route/NAT a port from outside to an internal machine (which has static IP or reserved IP in /root/udhcpd.conf.master like 192.168.12.200 for the example below) to export a service (if you host nextcloud on a machine in your lan and want to make it available) :
#iptables -t nat -A PREROUTING -j DNAT -i ${onboardwan} -p tcp --dport 9443 --to-destination 192.168.12.200:9443

#now, while your service above is available from outside, like https://your-public-ip:9443, it is sadly not responding from internal wifi, so we allow it as well this way
#iptables -t nat -A PREROUTING -j DNAT -i wlan0 -p tcp --dport 9443 --to-destination 192.168.12.200:9443

#if you want to allow SSH to your device from outside (be careful, you'll get a lot of dictionary attacks and hacking attempts), you may want to uncomment below to open port 22 from outside
#iptables -A INPUT -p tcp -m state --state NEW -m tcp --deport 22 -j ACCEPT


#If we have a second interface (usbnic) then, we assign an IP to it, and we start dhcp server, and add propoer firewall rules
if [ ! -z "${usbnic}" ]; then
#we have an USB NIC, we set it up to handle the LAN connections as well
#defining IP
/sbin/ifconfig ${usbnic} 192.168.13.1 netmask 255.255.255.0 broadcast 192.168.13.255
#starting dhcp server on it
#copy the master config file as base (no interface designed)
/bin/cp /root/udhcpd.conf.master /root/udhcpd.conf
#adding the proper interface
/bin/echo "interface ${usbnic}">>/root/udhcpd.conf
#sending DNS request to the pi-hole on pi-hole proper IP
iptables -t nat -A PREROUTING -j DNAT -i ${usbnic} -p tcp --dport 53 --to-destination ${wifinetip}:5353
iptables -t nat -A PREROUTING -j DNAT -i ${usbnic} -p udp --dport 53 --to-destination ${wifinetip}:5353
#Assuming you opened the port 9443 above on wan and wifi, you also want, if connected your LAN machines to be able to access the service, so you would uncomment
#iptables -t nat -A PREROUTING -j DNAT -i ${usbnic} -p tcp --dport 9443 --to-destination 192.168.12.200:9443
#allow ip forward from this LAN
iptables -A FORWARD -s 192.168.13.0/24 -i ${usbnic} -j ACCEPT
#We NAT the traffic from this LAN
iptables -t nat -A POSTROUTING -s 192.168.13.0/24 -j MASQUERADE
#starting udhcpd
/usr/sbin/udhcpd -S /root/udhcpd.conf

fi
#If you decided to open the port for your service on 9443 above (NAT), you need to accept it on the router too, so uncomment below
#iptables -A INPUT -p tcp -m tcp --dport 9443 -j ACCEPT

#I refuse any connection otherwise
iptables -A INPUT -i ${onboardwan} -j DROP

#We also load all the iptables helpers modules
/sbin/modprobe ip_nat_ftp nf_conntrack_netbios_ns xt_conntrack xt_multiport ip_nat_sip ip_conntrack_sip nf_conntrack_ftp nf_nat_ftp

exit 0
/root/udhcpd.conf.master : Define the dhcp service configuration for the LAN (USB Ethernet), and allow to reserve IP for machine connected to the ethernet port (not on Wifi, Wifi runs its own DHCP through create_ap and is not addressed here).
# Sample udhcpd configuration file (/etc/udhcpd.conf)

# The start and end of the IP lease block

start 192.168.13.10 #default: 192.168.0.20
end 192.168.13.254 #default: 192.168.0.254


# The interface that udhcpd will use

#interface eth0 #default: eth0

# The location of the leases file
#lease_file /var/lib/misc/udhcpd.leases #defualt: /var/lib/misc/udhcpd.leases

# The location of the pid file
#pidfile /var/run/udhcpd.pid #default: /var/run/udhcpd.pid

# The remainer of options are DHCP options and can be specifed with the
# keyword 'opt' or 'option'. If an option can take multiple items, such
# as the dns option, they can be listed on the same line, or multiple
# lines. The only option with a default is 'lease'.

#Examles
opt dns 192.168.12.1
option subnet 255.255.255.0
opt router 192.168.13.1
#opt wins 192.168.10.10
option domain local
option lease 864000 # 10 days of seconds

# Static leases map
#static_lease 00:60:08:11:CE:4E 192.168.0.54
#static_lease 00:60:08:11:CE:3E 192.168.0.44
In the file above, the key options are the defined IPs distributed to the clients. They work aside of the content of the rc.local file above, and must be adjusted acoordingly.
Why are the IP ranges different on Wifi and LAN, can they communicate
The IP range is different on Wifi and LAN because the way Access Point is created, it generates its own DHCP, and rules, which is used at the base configuration. It does not allow to bridge the LAN USB ethernet on it, therefore, i run a different DHCP server on the LAN Ethernet.
That said, both ranges are properly router, and can speak to each other without restriction, aside of the « BROADCAST ». That said, it is not that bad, and would still allow you to configure a printer on wifi, and reach it from Ethernet port, using its IP address. In the same time, it would limit virus propagation, since it would not automatically detect the other range. It is kind of partial isolation (regular isolation would not allow traffic between subnets).
So far, the create_ap script, does setup the proper FORWARDING and MASQUERADING rules allowing proper routing. It is not excluded that this change in the future, aiming to merge the 2 IP ranges in one.
A workaround on this, is to use your old wifi A/P or router as access point, which would bring all the devices on the same subnet.
What are these files in /home/pi
The files in this folder are a left over, a driver for the wisetiger 5Ghz wifi adapter that can be found on amazon. I initially wanted to create a fast wifi access point (and succeeded) using this cheap adapter.
BUT, the driver for this adapter is not in the raspbian kernel, that means, it has to be compiled and installed manually. Although it works, it is not convenient to maintain. Each time you update your system (apt-get update;apt-get upgrade ) and the kernel is updated, you lose the driver and have to compile it again. This is why i instead chose to use the embedded wifi, which always works.
If you want to play with this A/C adapter, this is the one : https://www.amazon.ca/WISE-TIGER-Adapter-600Mbps-Wireless/dp/B01M0Q51UI/ref=sr_1_3?ie=UTF8&qid=1541880411&sr=8-3&keywords=wise+tiger+wifi+adapter&dpID=41vLALqtM8L&preST=_SY300_QL70_&dpSrc=srch
Be aware that the scripts etc, are not configured to work with it. It should work, but you’ll have to work it out yourself. The adapter ID usually inherit the MAC of the device.
Changing the IP range of your network
At some point, you might need to change your local IP range, let’s says, because it is conflicting with your corporate VPN remote network and IP are conflicting.
Here are the actions to take to change the IPs :
File requiring modifications : /etc/rc.local and /root/udhcpd.conf.master
The system provides 2 subnets, a wifi subnet, and a LAN/ethernet subnet.
BE CAREFUL, A SINGLE SEMI-COLUMN missed or changed, and it won’t work as expected, you’d have to start over again, or find what you missed (i did re image couple of times :P )
Changing the default IP range of the wifi (192.168.12.x) to another one, like, 192.168.50.x :
– edit the file /etc/rc.local and replace the value of wifinetvalue, which is by default 192.168.12.1 by 192.168.50.1
– edit the file /etc/rc.local and find the line containing « create_ap », change it from this :
/usr/bin/create_ap --daemon --dhcp-dns ${wifinetip} --ieee80211n --ht_capab '[HT20+]' -c 11 -w 2 wlan0 ${onboardwan} ${wifissid} ${wifipass}
To that :
/usr/bin/create_ap --daemon -g ${wifinetip} --dhcp-dns ${wifinetip} --ieee80211n --ht_capab '[HT20+]' -c 11 -w 2 wlan0 ${onboardwan} ${wifissid} ${wifipass}
– Done for the wifi
– edit the file /root/udhcpd.conf.master and do the same as above, search and replace the value « 192.168.12 » by « 192.168.50 » (1 time, the DNS definition)
– reboot the device
Changing the default IP range of the wired LAN connection (USB adapter by default running on 192.168.13.x) to something else like 172.20.0.x :
– edit the file /etc/rc.local, search and replace the value « 192.168.13 » by « 172.20.0 » (basically, where the IP it will change the range where needed, at interface definition, forward and masquerade rules)
– edit the file /root/udhcpd.conf.master and do the same as above, search and replace the value « 192.168.13 » by « 172.20.0 »
– reboot the device
We do not change the settings of the onboard NIC, because it is used as WAN (public/internet/dangerzone) and we assume it is used with DHCP configuration.
The line defining this behavior and forcing DHCP is in /etc/rc.local and looks like this :
#Force dhcp on interface
/sbin/dhclient ${onboardwan}
If ever you’d need to use a STATIC IP on the WAN interface, this would be doable, using the ifconfig command as we do for the LAN/USB, replacing the line above by :
/sbin/ifconfig ${onboardwan} YOUR-STATIC-IP netmask YOUR-MASK broadcast YOUR-BROADCAST
What is this pi-hole thing and how to change the password
Pi-hole is a free software that is essentially a DNS based blacklist, used to drop all the adds servers, tracking servers and others parasites by blocking server name resolution from the clients.
Official website of pi-hole is here : https://pi-hole.net/
On the router, we have 2 firewall rules that take requests made to the router from the Ethernet USB (as it is advertised by DHCP as DNS server) on DNS port 53, and send them to pi-hole process that run on the raspberry binding on the access point (pi-hole only binds on 1 interface, so we use firewall rules to make it accessible).
You can reach the web interface of your pi-hole at the following place : http://192.168.12.1/admin/ (or the IP you used if you changed it)
The password for pi-hole admin interface is the same as default wifi : welcomepriv2 (you can change it from the pi-hole admin interface)
You can also do this from an SSH console (see option 2 on the link), connected as root on the raspberry, and type the following command :
pihole -a -p
What are these line starting with # in the rc.local and others files ?
In the rc.local file, and other listed above in this document, we see many lines starting with #. These lines are commented out, either kept as reference/example, either were part of trial and errors while working on the project.
Therefore, is would not be a good idea to remove the # and enable the line.
One example is the line « #systemctl restart dnsmasq », it was set initially in a attempt to fix a DNS refresh issue, dnsmasq being the DNS service used by pi-hole to server queries. In the end this was useless, or even killing the service. Therefore i had to comment it.
Some others are safe explaining, left to explain how to use certain options. As they say in Hawaii « in doubt don’t go out », so in this case, if you don’t know it, don’t touch it. There is no magical, no secret stuff what would make things better. As much as can do, i try to keep it working :P
Allowing ping to the device from outside (internet)
By default, ICMP packets are dropped, therefore, you are not be able to ping your router from internet, while being safer like this, you may prefer to allow ICMP for remote checks.
To do so, you just have to remove the « # » from the following line, and reboot the device :
#iptables -A INPUT -p icmp -j ACCEPT
When you remove the dash, the command will run at boot time.
If you want to avoid device reboot, you could, as root (ssh to the device pi@192.168.12.1 /or the IP you’ve set if you’ve changed it), and sudo bash, and then, type the command :
iptables -A INPUT -p icmp -j ACCEPT
This will enable the PING right away, without reboot.
Reserving IP for a device in DHCP (USB Ethernet LAN only)
The best way to assign a static IP on a device is to set it up manually, assuming this is to host services, but, sometime, like for a network printer, it is more easy to do at DHCP level. Here is how.
The default DHCP server for IPs on WIFI is managed by create_ap (https://github.com/oblique/create_ap), which initiate the WIFI Access Point at boot, not customization of IP on WIFI yet (later on, might bridge the connection, but not yet supported)
The default DHCP server configuration assign IPs on ethernet (USB LAN port) from 192.168.13.10 to 192.168.13.254. The configuration is located in /root/udhcpd.conf, and is overwritten each time we reboot from the file /root/udhcpd.conf.master (This is where we’ll manage the customization)
Assuming you did not yet change the IP range as explained here, otherwise, adjust to your settings, you can reserve IPs by attaching an IP to a device MAC address within the DHCP server range.
To do so, you’ll edit the file /root/udhcpd.conf.master, at the bottom, and follow the example, adding a line for your device.
Example :
static_lease 00:60:08:11:CE:4E 192.168.13.54
So, adjust to your device :
static_lease YOUR-DEVICE-MAC THE-IP-YOU-WANT-TO-RESERVE
Then reboot your device (type reboot, or sudo reboot, or as a wild beast, unplug and replug the PI …. might face a longer boot time due to disk check).
After reboot, the device plugged on LAN (USB Ethernet), will get the desired IP, allowing you to always reach it (good for printer), or to forward port from internet to it.
Redirecting a PORT to an internal device (NAT/ROUTING) to host a service
Now that you have your router/firewall running, and you know how to assign a static IP to a machine/device, it is time to allow remote access to it (you may host your own Nextcloud and you want to be able to remotely access to it etc.).
I assume you handle the security of anything you decide to make available on the internet (SSL + updates etc), then here is how to redirect a port.
I also assume you host this on the Ethernet side (USB LAN), since it makes no sense to host stuff on wifi… :) … i know you could, but common…
Your provider most likely restrict any port below 1000 (usually the case for residential connections), we’ll look into redirecting incoming connections on port 8443 to a device inside your LAN that host a service on port 192.168.13.50:443 (assuming again you reserved the IP 192.168.13.50).
This will require 2 modifications in the file /etc/rc.local.
1- find and look at the following lines in the rc.local file (port redirection) :
#Assuming you opened the port 9443 above on wan and wifi, you also want, if connected your LAN machines to be able to access the service, so you would uncomment
#iptables -t nat -A PREROUTING -j DNAT -i ${usbnic} -p tcp –dport 9443 –to-destination 192.168.12.200:9443
The line above are commented with a # at the beginning, just add your own below these, as follow :
iptables -t nat -A PREROUTING -j DNAT -i ${onboardwan} -p tcp –dport 8443 –to-destination 192.168.13.50:8443
Note : check that you are properly using the bold line above as reference, and adjust port and IPs
2 – find and look at the following other lines in the rc.local file (port opening) :
If you decided to open the port for your service on 9443 above (NAT), you need to accept it on the router too, so uncomment below
#iptables -A INPUT -p tcp -m tcp –dport 9443 -j ACCEPT
just add your own below the one above, as follow :
#I open port 9443 to reach my service
iptables -A INPUT -p tcp -m tcp –dport 9443 -j ACCEPT
Reboot the device, your service should now be reachable from your-public-ip:9443.
This is only handling TCP, you may want to open UDP as well, just replicate the lines, and replace TCP by UDP. and reboot.
Installing the noip client on your router
This one is simple, you run a standard raspberry pi with raspbian, so just follow the simple official documentation : https://www.noip.com/support/knowledgebase/install-ip-duc-onto-raspberry-pi/
Now, while the install is easy, it would not start the daemon automatically at boot.
To get the noip client to start automatically at boot, find the following lines in /etc/rc.local
#Force dhcp on interface
/sbin/dhclient ${onboardwan}
They are the one forcing IP setting on WAN interface, so just after, add the following lines :
#Start the noip client
/usr/local/bin/noip2;
Because we start it right after the WAN IP is setup, it will update the noip entry right after reboot with the potential new IP.
How to update my system (security requirement)
One of the main points of chosing to run a raspberry as your home router, is the security ! Especially the fact that you can keep your system up to date.
While most of the consumer router are left vulnerable as soon as reaching the market, running your own allow you to stay up to date.
So far, this is a manual process, and you should do it on a regular basis, to do as root on the device :
apt-get update
apt-get upgrade
You may want to automate this with the following command as root (reference) :
apt-get install unattended-upgrades
Because it runs a very standard raspbian system, with only genuine raspberry update, there is almost zero risk to break anything during update.
NOTE :
if you are stuck with the message « waiting for headers », this might be an issue with local pi-hole.
To get through this, stop the pihole FTL service before running apt upgrade or apt-get upgrade, as follow :
/etc/init.d/pihole-FTL stop
When updates are done, either reboot, or start the service again :
/etc/init.d/pihole-FTL start

You could also face outdated repository configuration as explained here :
https://www.raspberrypi.org/forums/viewtopic.php?t=142363
As explained in the post, replacing the repository URL in /etc/apt/sources.list by the following :
http://mirrordirector.raspbian.org/raspbian
Could help too.
Setup proper time on the device
The default timezone of the system might not match yours, changing it is easy.
Connected on the device via SSH, you run the following command :
sudo raspi-config
Then you go chose your timezone in the menu « 4 – localisation options » -> « I2 – Change timezone » -> Pick yours and validate.
Your device should then have the proper time. Verify by typing « date ».
Adding email sending capability (reports, logwatch etc)
By default, the system doesn’t come on the current image with email sending capacity, not even the mail command.
Most likely, as you use it as a home/lan router, the device is not designed to deliver email directly (they would be refused or end in spambox immediately).
To allow the box to send emails, we’ll install ssmtp on it, and configure it to use your provider SMTP or your own server.
Connected as root on the raspberry (ssh pi@192.168.12.1 and then sudo bash) :
apt-get update
apt-get install ssmtp heirloom-mailx mailutils s-nail
(accept the dependencies, y enter)
Once installed, we need to configure its config file to let is use the expected smtp, in /etc/ssmtp/ssmtp.conf, which should look as follow (with your own provider smtp settings ) :
#
# Config file for sSMTP sendmail
#
# The person who gets all mail for userids < 1000
# Make this empty to disable rewriting.
root=postmaster
# The place where the mail goes. The actual machine name is required no
# MX records are consulted. Commonly mailhosts are named mail.domain.com
#mailhub=mail
#we add the customized port in case we don’t use the default 25
mailhub=your-provider-smtp.server.tld:2525
# Where will the mail seem to come from?
#rewriteDomain=
# The full hostname
#hostname=raspappriv
hostname=myhomerouterofme
# Are users allowed to set their own From: address?
# YES – Allow the user to specify their own From: address
# NO – Use the system generated From: address
#FromLineOverride=YES
Once done, just test your setup by sending an email to one of your email addresses :
echo testraspberryrouter|mail -s « test raspberry router » your-email@domain.tld
This should get you an email from the device itself.
You can follow the email sending log with the following command :
tail -f /var/log/mail.log
And stop the follow by pressing CTRL+C
Install arpwatch to receive MAC address change activity on the network
Note : This installation require that the email sending capability is available, so you should have completed the previous bullet first
Arpwatch is a cool little tool, that will notify you as soon as there is a change in the arp table.
The arp table stores which MAC address has which IP. So as soon as a device join the network, you get an email stating « new device with this MAC on the network ». This is pretty cool, because usually you don’t have too many new device joining your network. Therefore, if you wifi is hacked (someone guessed/dumped the password), you’ll then get new device notification. At this point you may want to check which device has this IP, what is hosted on it, is it one of yours or someone nasty on your network ?
Install the tool (as root on the pi – sudo bash) :
apt-get update
apt-get install arpwatch
This program needs to be started at startup, so we’ll add it at the end of the /etc/rc.local, just BEFORE the line containing « exit 0 ».
We’ll add the following lines and then reboot the raspberry :
#We want arpwatch monitoring
#wait for interface to come up
/bin/sleep 10
#start arpwatch
/usr/sbin/arpwatch -i wlan0 -u arpwatch -m your-email@domain.tld
/usr/sbin/arpwatch -i ${usbnic} -u arpwatch -m your-email@domain.tld
Then reboot the device
At the first reboot, you’ll get a lot of notification, one per device on your network, then, it will only send you changes (check your spambox too).
A screen for the raspberry
I did not have at home a screen that could properly display the raspberry 3 HDMI output, so most of my « development » has been done without seeing the raspberry screen. I was plugging the SD card on my laptop, update config file, place back, wait for it to be online and SSH remote. Fine when it works, but tough when it no longer boots because of a typo in a config file.
So i bought this little screen on amazon : https://www.amazon.ca/Loncevon-Portable-Computer-Raspberry-Headphone/dp/B06XQJVXHL/ref=sr_1_2_sspa?ie=UTF8&qid=1542252897&sr=8-2-spons&keywords=raspberry+screen&psc=1
You’ll also need a separate HDMI cable, but then, it is pretty cool to just debut an issue at boot or so. Because in HD mode the letters are very small, you can change the resolution of the PI through the menu « raspi-config » (used with sudo or as root sudo bash), and change the resolution through the menu.
This screen also has a VGA port, and this is cool to, as i have bunch of linux boxes running without screen, it is easy to carry and plug for small check when needed.
Change the SSH listening port
By default, SSH listens on port 22 (SSH port), but this is something we might want to change, because most of providers block ports below 1000, so you should use a higher port for your SSH server, if ever you expect to connect to it from internet.
To do so, we’ll edit the SSH server configuration file.
Connect to the device using an SSH client as usual to edit configuration files as root.
This time will edit the file /etc/ssh/sshd_config.
Find the following line (showing as comment the default listening port) :
#Port 22
and add below the port you want (i like to keep the original info as comment for alter reference)
Port 8700
(assuming you decide to have SSH on port 8700)
Save and exit the file.
Then restart the SSH server by typing the following command :
service ssh restart
From now and on, the SSH listen on port 8700, the port you’ll have to use to remote to your device : ssh pi@your-device-ip:8700 (or set port 8700 in putty if using putty)
While still connected on the device you can check if SSH is listening on the desired port with the following command :
netstat -tanpu
and you should find a line that looks like this :
tcp 0 0 0.0.0.0:8700 0.0.0.0:* LISTEN 6574/sshd
Gotcha, your SSH now listen on the new port. Disconnect and reconnect to this port.
Note, at this stage, you still can’t connect remotely from internet, since the firewall does not allow connection from outside. We’ll see below how to safely handle this with knockd.
Allowing remote SSH to your router from internet (with knockd)
The simple way to do so, is to open the port as commented in the rc.local original file. BUT, as soon as you do this, your device will face attacks, dictionary attacks, port scanning and vulnerability scanning on your listening server, which can be bad for your router. This is the last thing you want to be corrupted/hacked.
Therefore, we’ll use a port opening and closing mechanism, to make this a little safer.
Basically, while running, the router does not export any open port (except if you NATed some stuffs), but none for SSH. It doesn’t mean you can’t reach it, you just need the secret PIN (sequence).
We’ll use knockd (more info http://www.zeroflux.org/projects/knock/ )
CONFIGURING KNOCKD
Connect to the device using an SSH client as usual to edit configuration files as root (ssh as pi, then sudo bash)
Switch to root user if you did not already
sudo bash
We install the needed software from the repository
apt-get install knockd
(confirm installation when prompted)
We need to identify your WAN device, you can run the following script to get the info (don’t change this script, it is used to boot properly) :
/root/get-nic.sh
Copy the result, we’ll use it below.
We’ll now edit the configuration file /etc/knockd.conf to make it look as follow (assuming you changed the SSH port to 8700 as explained above) :
Values explanations :
interface = use your WAN interface obtained from the get-nic script above
sequence = you define the PIN (sequence) you want to use to open and close, chose your own, 3 numbers (ports) above 1000, not using a port that you NAT, neither your SSH port
command = the firewall command used to open or close the port : ADJUST dport value to your SSH port, assuming your SSH listen to port 8700, keep 8700.
Note : we remove the drop rule of the wan interface, insert the SSH open port, and re insert the drop rule. Because iptables apply rules in order, the opening port must take place before the drop.
[options]
UseSyslog
interface = enxb827eba2ebbe-put-yours-instead
[openSSH]
sequence = 7001,8001,9001
seq_timeout = 5
command = /sbin/iptables -D INPUT -i `/root/get-nic.sh` -j DROP;/sbin/iptables -A INPUT -s %IP% -p tcp --dport 8700 -j ACCEPT;/sbin/iptables -A INPUT -i `/root/get-nic.sh` -j DROP
tcpflags = syn

[closeSSH]
sequence = 9001,8001,7001
seq_timeout = 5
command = /sbin/iptables -D INPUT -s %IP% -p tcp --dport 8700 -j ACCEPT
tcpflags = syn
Start the service as follow :
/bin/systemctl start knockd
Verify that it runs properly (should show active / running, if not, you did something wrong, start over) :
/bin/systemctl status knockd
Edit the configuration file /etc/rc.local and add the following at the end of the file, just ABOVE the exit command (after all other commands) :
#Start the knockd daemon
/bin/systemctl start knockd
We do this, because the service start before interface is properly configured at boot time, so we make sure that knockd starts when everything is UP.
Reboot the router.
OPENING THE PORT FROM YOUR CLIENT
Download clients from here : http://www.zeroflux.org/projects/knock/ Or install from your system repository (apt-get install knockd on debian/ubuntu)
If you need to build the client on CentOS, you can do it as follow :
wget wget http://www.invoca.ch/pub/packages/knock/RPMS/ils-7/SRPMS/knock-0.7-1.el7.src.rpm
yum install libpcap-devel
rpmbuild --rebuild knock-0.7-1.el7.src.rpm
cd rpmbuild/RPMS/x86_64
rpm -Uvh knock-0.7-1.el6.x86_64.rpm
Assuming you have the « knock » binary available, you can simply run the following command to open or close port for your IP :
#To remotely open the port :
knock your-public-ip-from-internet 7001 8001 9001
#To remotely close the port :
knock your-public-ip-from-internet 9001 8001 7001
(ideally you use a service like noip and you can easily reach your router at something like yourhost.noip.me)
Because you’ll most likely forget to close the port, or just don’t need to keep it open more than a few seconds, you can combine the action, adding a stop command to happen after the knock, modifying the file /etc/knockd.conf as follow :
[options]
UseSyslog
interface = enxb827ebd46b91
[opencloseSSH]
sequence = 7001,8001,9001
tcpflags = syn
seq_timeout = 5
start_command = /sbin/iptables -D INPUT -i `/root/get-nic.sh` -j DROP;/sbin/iptables -A INPUT -s %IP% -p tcp --dport 8700 -j ACCEPT;/sbin/iptables -A INPUT -i `/root/get-nic.sh` -j DROP
cmd_timeout = 30
stop_command = /sbin/iptables -D INPUT -s %IP% -p tcp --dport 8700 -j ACCEPT
With the configuration above, your port will automatically close after 30 seconds. So just enough time to establish the session. Once connected, it will not disconnect you, as established connections remain active.
So you only need 1 command to open a temp access :
knock your-public-ip-from-internet 7001 8001 9001
And right after, ssh to your host.
All done for knockd remote port opening configuration.
How do i plug more than 1 device on the LAN port (USB Ethernet)
It’s obvious to me, but maybe not for all, so you just need a switch (and ethernet CAT5 network cables).
One option is such switch, cheap, available online : https://www.amazon.ca/TP-Link-TL-SG1008D-1000Mbps-Switching-Capacity/dp/B001EVGIYG/ref=sr_1_1_sspa?ie=UTF8&qid=1543459329&sr=8-1-spons&keywords=switch&psc=1

So you keep the WAN port (onboard ethernet) straight to your modem and you plug the LAN port (USB) to the switch. Then any other ethernet devices to the switch.
Configuring Kuman LCD 3.5 Inch RGB TFT
Adding a fun touch to the router with an LCD showing pi-hole stats on it is quite cool.
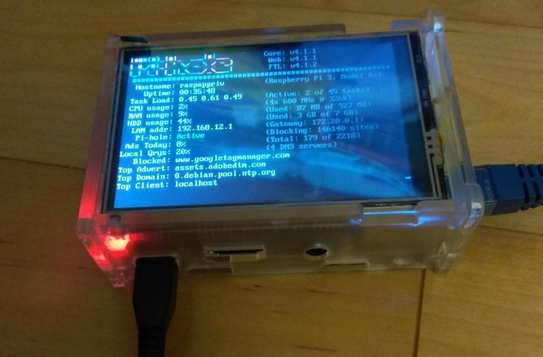
using pi-hole chronometer
So here is how to do it :
- Get an LCD kit like this one (LCD + Case) for your raspberry 3 : http://www.kumantech.com/kuman-35-inch-tft-lcd-display-480×320-rgb-pixels-touch-screen-monitor-for-raspberry-pi-3-2-model-b-b-a-a-module-spi-interface-with-touch-pen-sc06_p0014.html
- SSH to your raspberry and go in the root folder, we’ll follow the actual driver documentation available here : https://github.com/goodtft/LCD-show
We proceed as follow (the last command will reboot the device) :
git clone https://github.com/goodtft/LCD-show.gitchmod -R 755 LCD-showcd LCD-show/ sudo ./LCD35-show
All done, after rebooting, you should have the LCD displaying the system console. Now we want to light up the pi-hole stats :P
Plug a USB keyboard on the device, log as pi and your password.
Switch as ROOT (sudo bash), and type the following command :
pihole -c -r 2
And you should be all good.
IF you don’t see a top colored logo it could be that you don’t have the latest pi-hole version or system updates. In this case, update pi-hole :
pihole -up
And update the system
apt-get update
apt-get upgrade
reboot :)
Note, this is changing the default display of your system. If you want to get back to HDMI display :
sudo ./LCD-hdmiI did see some comment stating that having both the LCD AND HDMI screen connected would lead to kernel panic, so you should avoid this.
Using raspberry pi 3 B+ as wifi bridge
This is not the purpose of this project, but there is a very nice post on this blog, that explain you how to setup a nice Wifi Bridge with the raspberry.
The raspberry connect to a wifi, and share the connection with you, with firewall on the wifi, so the wifi network can’t reach your side. This is cool in hotels and so on. You could even use one raspberry as bridge, with a second one with the current router project, if you which to have your own access point or repeater (given it is tough to find wifi adapters that support full AP mode ) :
https://willhaley.com/blog/raspberry-pi-wifi-ethernet-bridge/
Update 2019 Apr 6th : Adding my own tutorial on this since i’ve made it in between : http://blog.inforeseau.com/2019/01/using-raspberry-pi-3-as-wifi-bridge-and-repeater-and-firewall
Updating firmware (kernel) with rpi-update
To maintain your raspberry pi 3 to the latest system and firmware, you should run the command : rpi-update
This will allow your raspberry to boot the very last kernel available. Command results should look as follow, and require reboot after installation :
The update takes some time, don't worry and be patient :D , it should look as this :
root@raspappriv:/home/pi# rpi-update
*** Raspberry Pi firmware updater by Hexxeh, enhanced by AndrewS and Dom
*** Performing self-update
*** Relaunching after update
*** Raspberry Pi firmware updater by Hexxeh, enhanced by AndrewS and Dom
#############################################################
WARNING: This update bumps to rpi-4.19.y linux tree
Be aware there could be compatibility issues with some drivers
Discussion here:
https://www.raspberrypi.org/forums/viewtopic.php?f=29&t=224931
##############################################################
Would you like to proceed? (y/N)
*** Downloading specific firmware revision (this will take a few minutes)
% Total % Received % Xferd Average Speed Time Time Time Current
Dload Upload Total Spent Left Speed
100 168 0 168 0 0 526 0 --:--:-- --:--:-- --:--:-- 526
100 58.3M 100 58.3M 0 0 3663k 0 0:00:16 0:00:16 --:--:-- 3256k
*** Updating firmware
*** Updating kernel modules
*** depmod 4.19.32-v7+
*** depmod 4.19.32+
*** Updating VideoCore libraries
*** Using HardFP libraries
*** Updating SDK
*** Running ldconfig
*** Storing current firmware revision
*** Deleting downloaded files
*** Syncing changes to disk
*** If no errors appeared, your firmware was successfully updated to 3e41468095829994433c52c04171afc434f8f3c3
*** A reboot is needed to activate the new firmware
root@raspappriv:/home/pi# reboot
After reboot, you'll fun the latest version available, and everything should work as expeted.
pivpn, use your raspberry as a VPN server
Yet i tested it on a fresh image, and it’s getting installed.
The pivpn install script is actually installing iptables services and bunch of other options, but, given all this project loads everything from rc.local, it happens after everything has been initialized, so iptables service rules got wiped and proper ones are overwriting them at then end of the boot.
The only manual works seems to add the opening of the port in /etc/rc.local, just below he SSH commented example :
#we want to allow openvpn to work on port 1194 UDP
iptables -A INPUT -p udp -m state –state NEW -m udp –dport 1194 -j ACCEPT
and then reboot.
http://www.pivpn.io/
I’ll add more comments on this later on.
Opening SSL port 443 and NAT it to an internal machine
Because of pi-hole and network performance, we blocked all communication on port 443 at very beginning of initialization.
Unlike other ports, opening port 443 (either on the device, or to be NATED to another machine on the LAN) require specific modification.
We basically need to set the opening port rule BEFORE the pi-hole port blocking, and ONLY for the WAN interface (as pi-hole block performance only matters on local connections, both LAN and WIFI).
Identify the following part of the /etc/rc.local script, we’ll need to add our rule ABOVE these :
#We fix slowlyness due to pi-hole as explained here : https://pi-hole.net/2018/02/02/why-some-pages-load-slow-when-using-pi-hole-and-how-to-fix-it/
iptables -A INPUT -p tcp --destination-port 443 -j REJECT --reject-with tcp-reset
iptables -A INPUT -p udp --destination-port 80 -j REJECT --reject-with icmp-port-unreachable
iptables -A INPUT -p udp --destination-port 443 -j REJECT --reject-with icmp-port-unreachable
So we add the new port opening above, and it should eventually look like this :
#before blocking 443 we do allow from outside as we want to host openvpn on 443, and DNS is only an issue from inside
iptables -A INPUT -i ${onboardwan} -p tcp --dport 443 -j ACCEPT
iptables -A INPUT -i ${onboardwan} -p udp --dport 443 -j ACCEPT

#We fix slowlyness due to pi-hole as explained here : https://pi-hole.net/2018/02/02/why-some-pages-load-slow-when-using-pi-hole-and-how-to-fix-it/
iptables -A INPUT -p tcp --destination-port 443 -j REJECT --reject-with tcp-reset
iptables -A INPUT -p udp --destination-port 80 -j REJECT --reject-with icmp-port-unreachable
iptables -A INPUT -p udp --destination-port 443 -j REJECT --reject-with icmp-port-unreachable
This will allow external request to port 443 to be accepted. Now, because we host the service on port 443 on another machine inside our network, we have to add the NAT to send traffic to this machine.
Most likely you use wired connection, so you’d better place the following lines in the « if usbnic » section, as follow (lines to add) :
#To internal ssl server from outside
iptables -t nat -A PREROUTING -j DNAT -i ${onboardwan} -p tcp --dport 443 --to-destination xx.xx.xx.xx(local ip of the machine hosting the service)
iptables -t nat -A PREROUTING -j DNAT -i ${onboardwan} -p udp --dport 443 --to-destination xx.xx.xx.xx(local ip of the machine hosting the service)
and reboot the device.
Contacting me for missing information
Warning here :P – Contact me if you think something is missing, there is a bug or so. Not actually providing support, this is a all done on my free time, i’ll be happy if you find anything useful in here.
Contacting me for missing information in this FAQ, get in touch on linkedin https://www.linkedin.com/in/alexandre-blanc-88569022/
![]()
Links

Calendrier
| L | M | M | J | V | S | D |
|---|---|---|---|---|---|---|
| 1 | 2 | 3 | 4 | 5 | ||
| 6 | 7 | 8 | 9 | 10 | 11 | 12 |
| 13 | 14 | 15 | 16 | 17 | 18 | 19 |
| 20 | 21 | 22 | 23 | 24 | 25 | 26 |
| 27 | 28 | 29 | 30 | 31 | ||
Recherche
Derniers articles
Tresronours Twitter

Keywords cloud topic
Membre de la FSF
Liens qui vont bien
Mots clés vrac – keyword cloud
License du contenu – CC By NC SA

This création is licensed under a Creative Commons Paternité - Pas d'Utilisation Commerciale - Partage des Conditions Initiales à l'Identique 2.0 France License.
Archives
- Getting voLTE on your Android with Fizz and others
- Defining the scope of an ISMS within ISO 27001
- Resumed posting and expanding on X
- Linkedin Access to your account has been restricted – Final debrief and resilience plan
- I’m thankful for the support I get in rough time
- Cyber security news of the day – 2024 May 31
- Alexandre Blanc Cyber Kicked out from Linkedin
- You’ll most likely find me on LinkedIn
- The Russian roulette landing page !
- RTSP, Debian, VLC, not playing, IP Camera
- 5G network hosted in the cloud, no internet, no phone ! So smart ! And I ended on TV, This week in cyber
- They lock the door for privacy… but they keep a copy of the key, and couple of backdoors
- Worst is yet to come, but they all warned you
- Migrating an old WordPress and handling character set, UTF8, latin1, latin1_swedish_ci
- From a broken TLS CA, to Facebook, to FIN12 hit and run
- Yes we can fix this mess, but do we want to ? That’s another story
- Criminals are still dominating the game, why are we doing so wrong, and what can we learn in this tech ocean ?
- Riding cloud can be tricky, don’t fall from it, in the weekly cyber !
- The threat landscape is very dynamic – Cyber news this week
- Cybersecurity is not obvious even for this newsletter !
- Install Slack desktop app on Kali rolling fixing libappindicator3-1 missing dependency
- How to delete all resources in azure to avoid charges after trial on your forced credit card registration
- Proxmox – ZFS – Dead drive on active VM, recover from replicated disk
- Restrict access to proxmox web admin interface
- Migrate your ESXI VMs to proxmox ZFS
- Install your VPN server with pi-hole on OVH VPS in 30 min
- Using raspberry pi 3 as wifi bridge and repeater and firewall
- Raspberry 3 – create a wifi repeater with USB wifi dongle
- raspberry 3 – routeur pare feu point d’acces wifi avec filtrage pub et tracking – router firewall access point with ads and tracking filtering
- Dell XPS 13 touchpad – corriger la sensibilité
- Utiliser Zazeen set top box depuis une connexion videotron
- Fermeture de mon compte facebook – la dernière goutte
- Choisir un kernel par defaut au demarrage de Centos 7.2 – configuration grub2
- Openvpn access server 2.0.25 et android
- Régler la luminosité du laptop par ligne de commande
- chromium outlook web app version complete sous linux
- Nexus 7 2012 – android 5 lollipop solution au probleme de lenteur
- HDD led sur Xubuntu – xfce
- xubuntu 14.04 verrouiller ecran de veille et desactiver mise en veille a la fermeture de l’ecran
- Authentification avec Radmin en utilisant Wine sur Gentoo
- Patcher bash sur une distribution plus supportee comme fedora 11
- Zimbra desktop sous xubuntu 14.04 64bit – fix
- xubuntu 12.10 probleme de son avec VLC – pulse audio – alsa – toshiba L855D – solution
- Evolution sous xubuntu 12.10 – bug affichage a la configuration – solution temporaire
- Booster son acces internet en changeant de DNS pour opendns
- Serveur DLNA sous ubuntu – minidlna
- sshfs sous windows – dokan sshfs
- xubuntu 11.10 Installer le plugin java pour firefox
- Installer Google Earth sur Xubuntu 11.10
- Installer nagios sur Fedora 11 depuis les sources